Photograms
A photogram is a photographic image made without the use of a camera, but by placing objects directly onto the surface of a photo-sensitive material such as photographic paper and then exposing it to light. The result is a negative shadow image varying in tone, depending on the transparency of the objects used. Areas of the paper appear white when it has received no light appear night; those exposed through transparent or semi-transparent appear grey/white.
Source: Wikipedia
How To Make A Photogram
My Photograms
- Set-up the enlarger to F11.
- Adjust the enlarger lamp until both larger than a small piece of paper and in focus.
- Place the red filter over the lamp and set the timer to three seconds.
- Get a piece of photopaper and centre it where the light will shine, with the shiny side up.
- Place at least two objects on top of the paper in any way you wish.
- Take a piece of cardboard and cover 2/3rd ‘s of the paper, remove the red filter and press your timer light. Once the timer goes off, place the cardboard so that it covers the second 1/3rd of the paper and press the timer light. When the light goes off, fully remove the cardboard and press the timer light for the last time.
- Place the photopaper in the developer bath for 2 minutes. Make sure that the paper sits at the bottom of the bath or the chemicals won't develop your whole image. Gently lift the tray up and down regularly so that the paper gets covered.
- When two minutes has passed, grab your image with a pair of tongs and place it diagonally in the air so that all of the chemicals drip off the paper.
- Once all of the chemicals gone, place in your stop bath for one minute, again make sure that the paper sits at the bottom of the bath. Shake regularly.
- When one minute has passed, grab your image once again and place it diagonally as previously explained so that all of the chemicals drip of the paper.
- Once the paper dry, place in your fix bath for four minutes. Make sure your paper sits at the bottom of the bath and shake regularly.
- Take your image to the sink and soak with water for four minutes.
- Once soaked, place into the dryer.
My Photograms
|
|
|
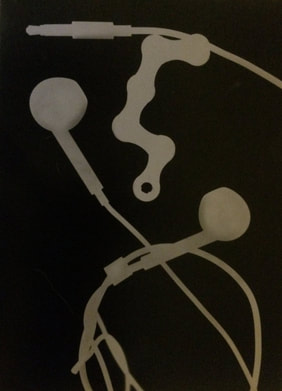
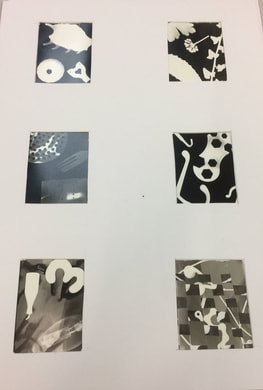
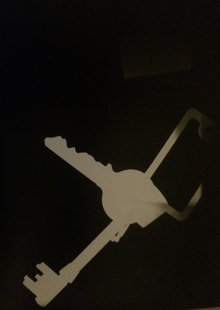
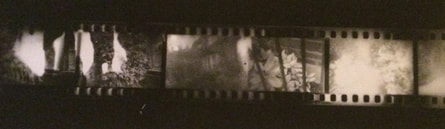
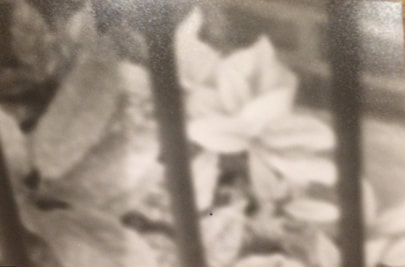
I made eight different photograms with different themes using different techniques such as weaving and solarisation and placed the best six onto a contact sheet. The themes involved nature, silver, lights, household items and items found on a beach. The weaving process involved trimming vertical lines through two different images and merging them together whilst solarisation involved over exposing an image to make white areas of an image appear darker, and darker areas of an image lighter.
The Pin Hole Camera
The pin hole camera is probably the simplest camera you can imagine and is based on the camera obscure, which is a large room or container that has been blacken out except for a small hole of light but the pin hole camera is a much smaller version where light passes through a simple hole on to photographic paper.
The pin hole camera is probably the simplest camera you can imagine and is based on the camera obscure, which is a large room or container that has been blacken out except for a small hole of light but the pin hole camera is a much smaller version where light passes through a simple hole on to photographic paper.
How To Make A Pin Hole Camera
1. Cover the whole of the inside of a small pringles can and the lid using black card and glue
2. Once completed, stick a small piece of foil anywhere on the outside of the can
3. Cut a small hole through the foil and can using a utility knife
4. Lastly, using a small of black card, stick the end of it next to the hole so that it is able to cover the hole to prevent light from entering in or escaping out.
My Pinhole Camera Photos
|
|
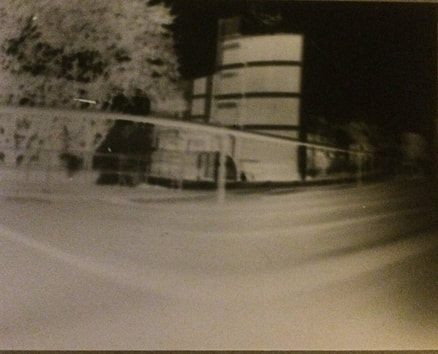
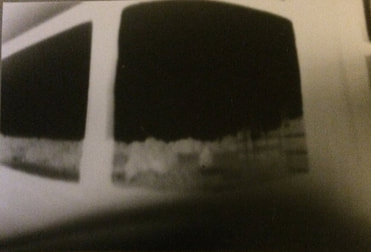
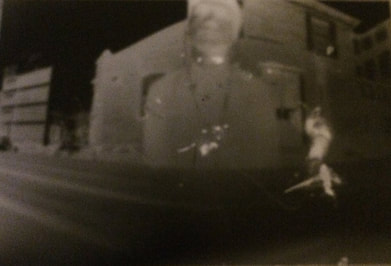
Using our pin hole cameras, I managed to capture and develop three different images: Outside facing a building, out of a window as well as a person with buildings located in the background. In order to make sure my images weren't too dark or light, considering how bright it was the day I attempted the task, I removed the foil (covering the hole) for 8 seconds. This allowed the correct amount of sunlight in to make an image clear and visible. One problem with my photo out the window is that it is very blurry due to the fact the camera was hand-held; next time I will rest the pin-hole camera on to a steady platform to prevent the image from blurring.
How To Enlarge Film
1. Place the processed film in a film holder, exposing the negative you want enlarged in the centre where a square is located.
2. Place the film holder into the enlarger, switch the light on and focus until the negative can be seen clearly.
3. Adjust it so the negative is the same size as photographic paper.
4. Once adjusted, change your aperture to either 11 or 8 and turn your lamp off.
5. Place the photographic paper on to the platform and get a piece of black card.
6. Expose 1/3rd of your paper and using your stop light, shine it on for three seconds. Next expose 2/3rd s of the paper and once again shine the lamp for three seconds. Do it for one last time without the card for three seconds.
7. Develop your image like developing a photogram. Place in the developer bath for two minutes, change it to the stop bath for one minute then into you fix bath for four minutes and lastly into the sink for four minutes.
8. Place into a dryer.
I used an aperture of 11 and exposed the negative for a total of 9 seconds (three seconds for each third).
My enlarged image wasn't too dark from too much light exposed or too white from little light exposed. Also, there is a contrast of black and white in my image which creates a certain effect. However my image was slightly blurry due to my camera not being in focus. Next time I will ensure every photograph I take is in focus.
|
|
